We love us some DIYed wedding hairstyles. Even for those of us without mad hair skills (cough — like me — cough), using hair accessories, headpieces, fascinators, adding in flowers, and rocking a sleek updo are all ways to make fabulous hair come easy.
We've compiled a collection of some spectacular DIY wedding hairstyles to hack yourself, take in to your stylist, or just keep on hand (or bookmarked in your phone) in case you end up sans hairstylist on the day-of and have to handle your own hair. It doesn't have to be scary, I promise. I even tried one out myself (the messy French twist!). Here's the proof.
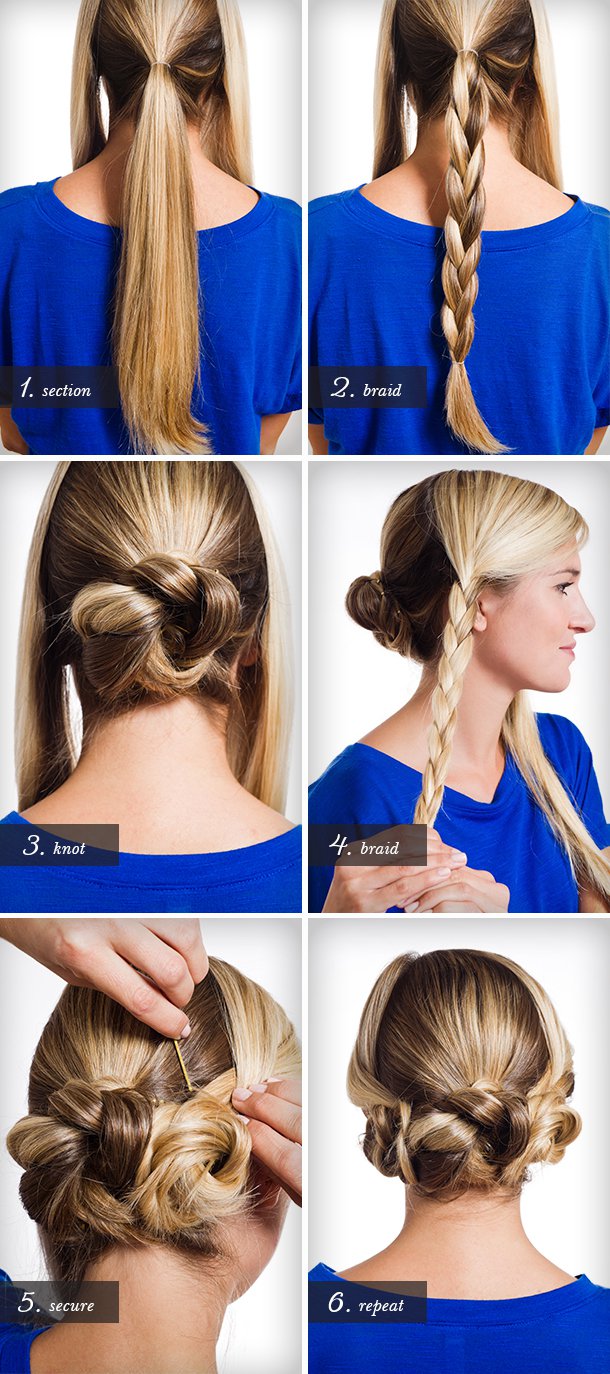
Triple-braided bun

This triple-braided bun is great for medium to long hair and only takes some braid and clip skills.
Side-swept curls

These side-swept curls are great for natural black hair and naturally curly hair. Clip up both sides for a faux hawk!
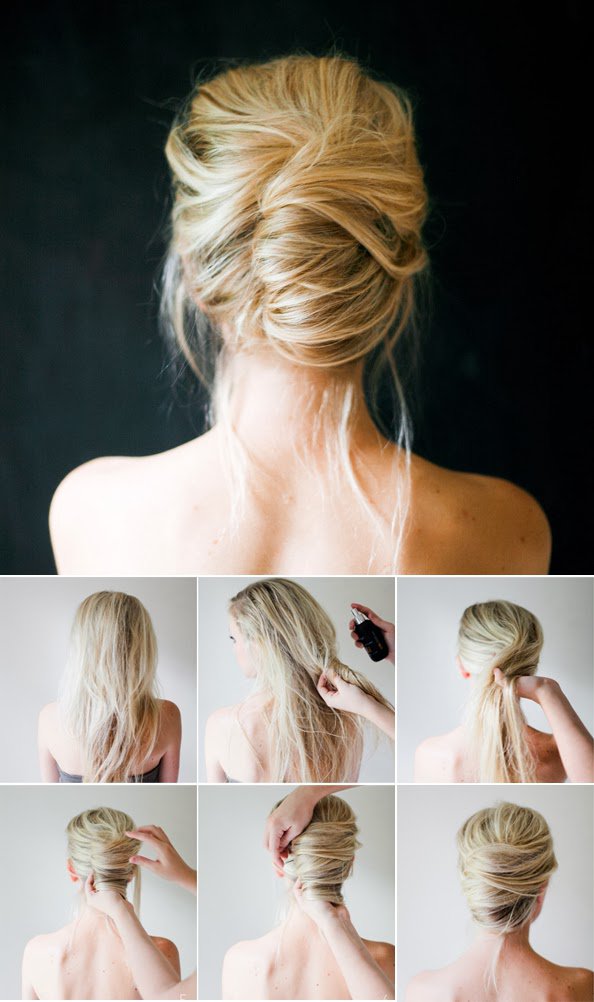
Messy French twist

I took on the challenge of trying this messy French twist out myself since it looked so hypothetically easy. No joke, it WAS easy. If you have someone else folding it over, I'm sure it would look much nicer (and less tornado-y), but even doing it alone was pretty simple:


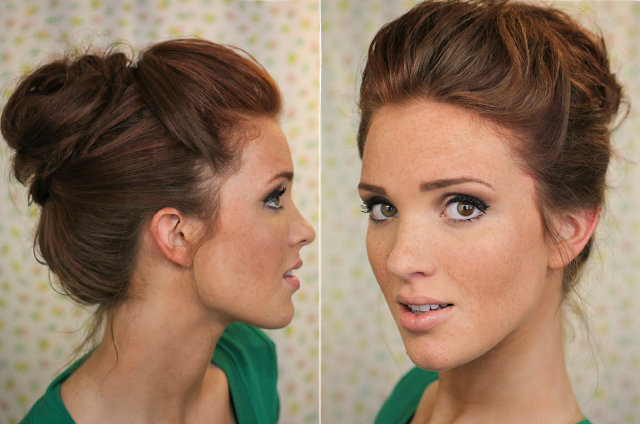
Bouffant bun

This bouffant bun is more forgiving than it looks.
Retro pincurls
http://instagram.com/p/yVAGAUFfJQ/?modal=true
Photographer Leah Langley tried our retro pincurl tutorial and rocked it.
Here's another take on vintage curls — retro fingerwaves:
Milkmaid braids

These milkmaid braids for short hair utilize a few extensions to take them to the next level of boho loveliness.
Here's a version of milkmaid braids with a little height and sideswept bangs:

Easy twist updo for short hair

YES: an easy twist updo for short hair that totally achieves full updo status.
I love a good short hair style hack.
Fancy five-strand braid
This five-strand braid was one that I challenged myself to do but didn't exactly succeed. Definitely try it yourself, though, since it should just take a little practice.
Chunky two-strand flat twist updo

This super cutie is rocking a chunky two-strand flat twist updo.
Flat twist faux hawk
I totally mentioned a faux hawk before, and now I'm following through on it.
Take a look at this flat twist braided faux hawk.
Doughnut bun

Doughnut buns don't just sound delicious… they look it, too! Plus, it uses one of those hair bun doughnuts which are so fun.
Vintage updo
No seriously, this is actually a DIYed hairstyle. Looks fancy, eh? Here's the tutorial for flawless vintage-style wedding hair.
Renaissance hair taping
Want a really retro style? Think Medieval with this Renaissance hair taping style.
Easy headscarf roll

This easy headscarf roll allows you to keep your hair super secure with a headscarf or headband. A little extra hair security never hurt.
Cinnamon roll updo for natural hair

Another delish-sounding style: this cinnamon roll updo for natural hair.
French roll twist

Take a French twist and add in some bunnage with this French roll twist.
Loose Twist

Rustic weddings will embrace this loose twist with ease. So romantic, many waves.
Simple, twisty updo

This simple, twisty updo might just be my favorite since it looks like it's the easiest. Give it a try and let me know!
More DIY hair fun
What's your hairstyle plan of action for the wedding? Share in the comments!


A lot of this is under the assumption that you can braid your own hair. I can’t. I can just manage a ponytail. If I try a braid I just get confused about which hand is which and what goes where. I just lack all coordination.
I had to learn braiding as a progression. First I learned how to braid 3 ropes (or thick strings) together, just to get the hand movements right. The ropes keep themselves separate, and you can see everything you’re doing, so it makes the whole process a lot easier when you’re just starting out.
Then I worked to clusters of smaller strings, to get the hang of braiding groups of things. The idea was to have about as much in a string cluster as I would hair in a standard braid, so I could get a feel for it. Then I started pulling my hair to the front where I could see it and braiding that. If you have someone else’s hair you can braid, or even a doll or wig to practice on, that would work as well for this part.
Once you think you’ve got all that down, try a side braid. You can still see what you’re doing, and a mirror can help you see how it looks throughout the process. Anything you do at the back of your head is going to be a combination of muscle memory from other braids you’ve done, feeling your way along, and mentally visualizing the process. It sounds complicated (and if you’re trying to learn to braid by starting at this point, it is), but if you’ve done the whole progression to this point, most of it is happening subconsciously anyway and you just focus on not letting your fingers or hair get tied in knots.
That’s good advice on the muscle memory thing. I can braid, it’s just the whole not seeing thing so that would definitely help there. My hair’s on the shorter side at the moment (just touching my shoulders) so it’s not too high on the priority list but this is great stuff to remember for as it gets longer. Thanks! 😀
So, this is probably going to sound completely counter-intuitive, but I actually taught myself to braid my hair while camping, with no mirror of any kind available. I was like 19 at the time, and had gone my whole life being completely unable to braid my own hair.
(If you can’t braid at all, I would definitely recommend the advice of the other commenter regarding teaching yourself to braid first, especially with multiple strands. It would also help to practice braiding a friend’s hair once you’ve got a bit of rope or ribbon down.)
If you already can braid someone else’s hair (or once you have mastered that), then I actually recommending eschewing any and all mirrors and proceeding only by feel. The reason is that since mirrors reverse everything, it can be really confusing; for me, I had the worst time trying to use a mirror to braid, and I lost any coordination I had and ended up with a mess. So I gave up.
Then I got lazy about getting my hair cut, and it got really long. I was out camping, and it was hot and sticky and gross, and a ponytail just was NOT going to cut it get it all off my back and neck. So I sat my butt down on a picnic bench at the campsite and brushed it out, and then proceeded to try braiding it blind, since I didn’t really have any other options. It took a couple of tries, but after 3 or 4, I figured it out. A few years later, the same thing happened with teaching myself to french braid, because my hair was an annoying in-between length and wouldn’t stay put in a regular braid. So once again, I was camping and didn’t have a mirror and it was bloody hot, so I sat down for half an hour to get it figured out. (I’d definitely say that you need to know how to french braid someone else’s hair first, or it would be next to impossible to figure out on yourself.)
Anyway! My point is that a mirror may not actually be your friend, and might get in the way a lot more than it helps. So give a shot to braiding away from a mirror entirely and focus exactly on how things feel, and you might be surprised to find it’s easier. 🙂 Good luck!
This is all really great advice, thank you! 🙂
All of this looks scary to me, but then again, I’m useless at hair and fail at ponytails even! However ,this looks like a nice tutorial to give to a friend who may actually be able to help 🙂
See, that’s exactly how I would use this–I actually can braid and even French braid if I’m so required, but sideways French braids and 5 strand braids are out. Luckily, I’m going to be getting married (in several years) in my hometown and there’s a hairstylist there that can do nearly anything as long as I have a picture.
They always looks so easy, but then the last steps of securing the pieces are where I always mess up. For example, that messy French twist seems great and easy following how to form it, but there are no pictures or instructions on how it stays there. Bobby pins? Magic?
I too can barely put my hair up in a ponytail. I would definitely recommend clip in hair pieces if you’re lacking in skills or time. They’re so easy- you can get clip in ponytails, buns that tie in like a scrunchie or half wigs that give you extra length and volume. I also love my Babyliss Big Hair styler, which gives you a professional looking blow dry no matter how cack-handed you are.
This is all also under the assumption that I more than a few wisps of thin shoulder length hair :’) ha ha. Deary me, I’m not sure what I’m doing to do, I don’t like the idea of hair pieces but then I don’t want my hair to look boring or how it normally looks. I think backcombing is going to be my friend 😀
“I found it to be an excellent tutorial to get an idea about different
hair styles I have been trying and in most I am successful.”
I loved this tutorial for different hairstyles it has.